
Snack time doesn’t have to break the bank! Here’s a list of 30 budget-friendly snacks that are easy to make and won’t cost you a fortune. Whether you’re craving something sweet or savory, there’s something here to satisfy every munching moment without sacrificing your wallet.
Rice Cakes with Nut Butter and Sliced Banana
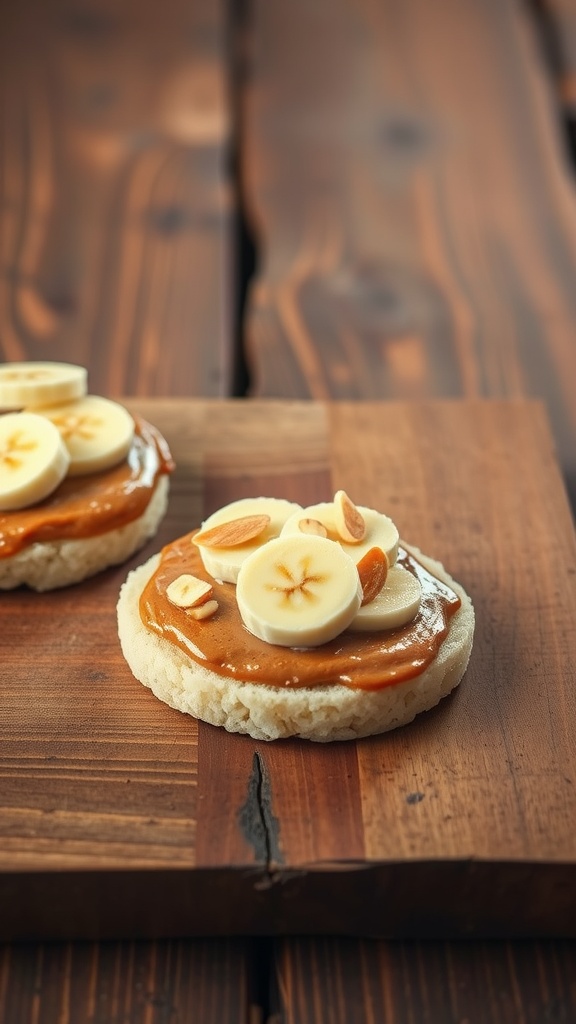
This snack is a sweet and satisfying way to get your energy boost without breaking the bank. Rice cakes provide a light and crunchy base, while creamy nut butter adds depth and flavor. Topped with fresh banana slices, this snack is not only delicious but also quick and easy to prepare.
Perfect for a midday pick-me-up or a healthy dessert, these rice cakes are customizable. You can switch up the nut butter or add a sprinkle of cinnamon for extra flavor. It’s a simple, wholesome snack that kids and adults will love!
Ingredients
- 2 rice cakes
- 2 tablespoons nut butter (peanut, almond, or your choice)
- 1 banana, sliced
- A handful of nuts (optional, for topping)
Instructions
- Spread a tablespoon of nut butter evenly over each rice cake.
- Layer the banana slices on top of the nut butter.
- If desired, sprinkle chopped nuts over the banana for added crunch.
- Enjoy immediately or pack for a snack later!
Homemade Trail Mix with Nuts and Dried Fruits
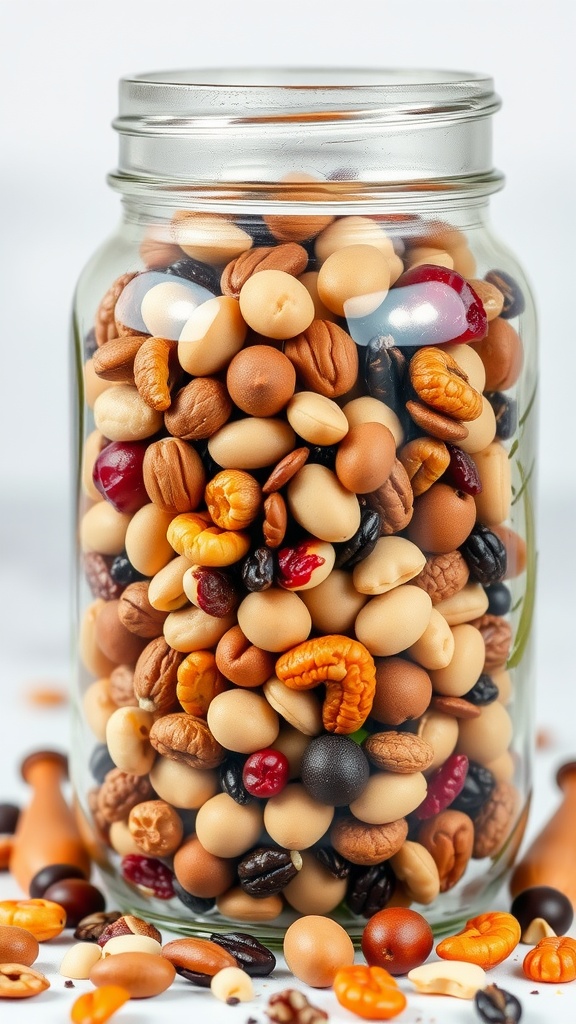
Homemade trail mix is a fantastic snack that combines the crunch of nuts with the sweetness of dried fruits. It’s a simple and fun way to create a personalized mix that can satisfy your cravings, whether you’re on the go or relaxing at home. The nutty flavor pairs beautifully with chewy fruits, making each bite a delightful experience.
This mix is not only tasty but also budget-friendly. You can easily adjust the ingredients based on what you have at home or what’s on sale. It’s perfect for kids and adults alike and can be packed for school lunches or enjoyed during movie nights. Here’s a quick recipe to get you started!
Ingredients
- 1 cup almonds
- 1 cup walnuts
- 1 cup cashews
- 1 cup dried cranberries
- 1 cup dried apricots, chopped
- 1/2 cup dark chocolate chips (optional)
- 1/4 teaspoon salt
Instructions
- Mix Ingredients: In a large bowl, combine the almonds, walnuts, cashews, dried cranberries, and chopped apricots. If you like chocolate, add the chocolate chips.
- Season: Sprinkle the salt over the mixture and toss everything together until evenly coated.
- Store: Transfer the trail mix to an airtight container for storage. It can be kept at room temperature for up to two weeks.
- Enjoy: Take a handful whenever you need a quick snack or energy boost!
Vegetable Sticks with Hummus Dip
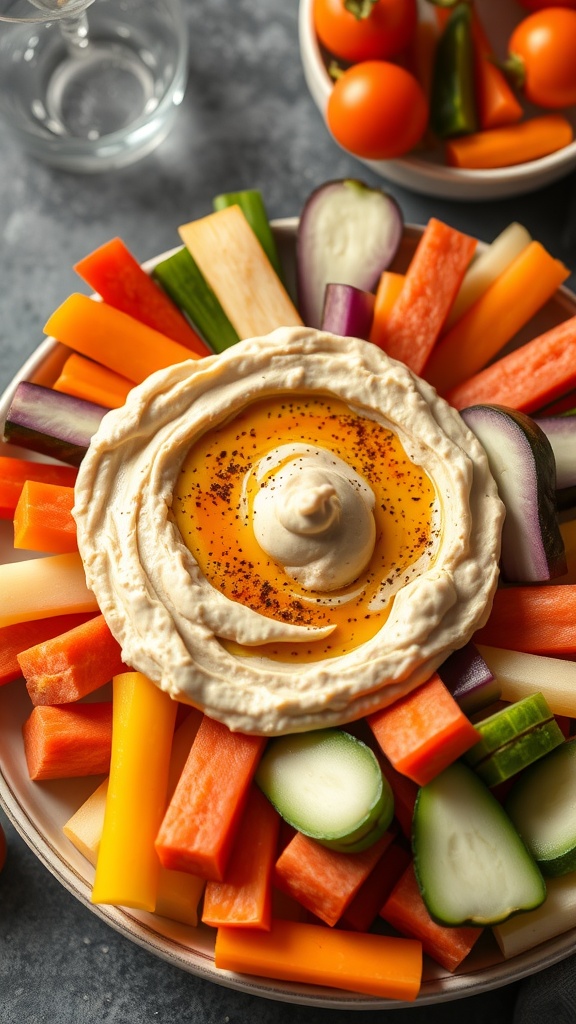
Vegetable sticks with hummus dip are a tasty and healthy snack perfect for any time of day. Crunchy and colorful, this dish combines fresh veggies with a creamy, flavorful dip that is simple to whip up. The combination of crisp vegetables and the rich taste of hummus creates a satisfying contrast that is both refreshing and filling.
Making vegetable sticks with hummus is straightforward and requires minimal preparation. Just chop your favorite veggies into sticks and serve them alongside a homemade or store-bought hummus. This snack is not only budget-friendly but also a great way to sneak in more nutrients into your diet. Perfect for kids and adults alike!
Ingredients
- 2 large carrots
- 1 cucumber
- 1 bell pepper (any color)
- 1 zucchini
- 1 cup cherry tomatoes
- 1 cup hummus (store-bought or homemade)
- 1 tablespoon olive oil (optional)
- 1 teaspoon paprika (optional)
Instructions
- Wash and peel the carrots and cucumber. Slice the carrots and cucumber into sticks.
- Remove the seeds from the bell pepper and cut it into strips.
- Slice the zucchini into sticks as well.
- Wash the cherry tomatoes and set aside.
- Arrange all the vegetable sticks on a platter around a bowl of hummus.
- If desired, drizzle the hummus with olive oil and sprinkle with paprika for extra flavor.
- Serve fresh and enjoy your healthy snack!
Yogurt Parfaits with Granola and Berries
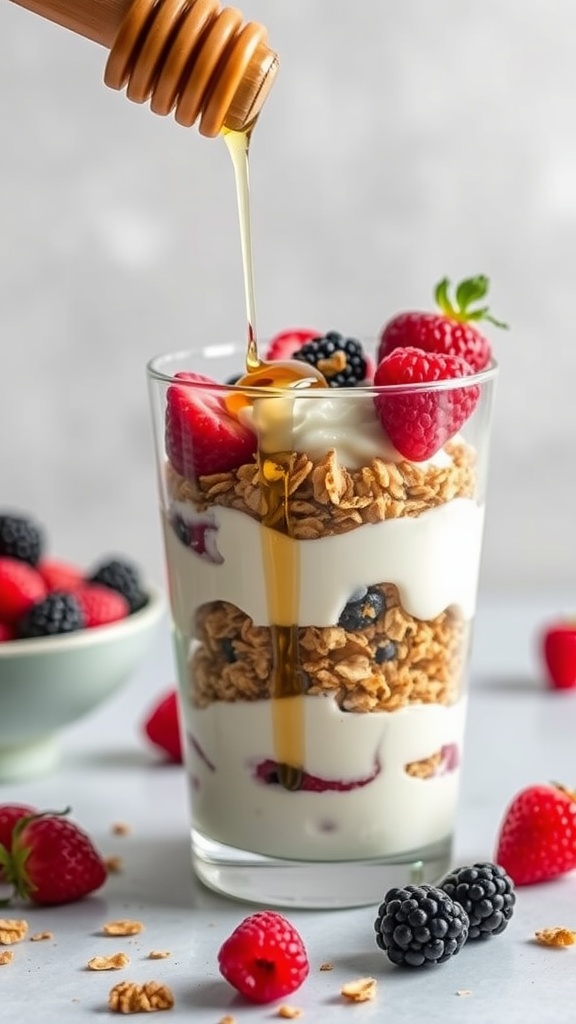
Yogurt parfaits are a delightful and healthy snack that’s easy to whip up. They combine creamy yogurt, crunchy granola, and fresh berries for a tasty treat that’s perfect any time of day. The sweetness of the fruit pairs wonderfully with the tangy yogurt, making each bite a burst of flavor.
Not only are they budget-friendly, but they also provide a nutritious option for those busy mornings or afternoon cravings. Layer the ingredients in a glass for a beautiful presentation, and enjoy the satisfying crunch of granola with the freshness of the berries.
Ingredients
- 2 cups plain or flavored yogurt
- 1 cup granola
- 1 cup mixed berries (such as strawberries, blueberries, and raspberries)
- Honey or maple syrup (optional, for drizzling)
Instructions
- Prepare the Layers: Start by washing the berries. If using strawberries, slice them into smaller pieces.
- Layer in Glasses: In a clear glass, add a layer of yogurt, followed by a layer of granola, and then a layer of berries. Repeat the layers until you reach the top of the glass.
- Add Sweetness: Drizzle honey or maple syrup over the top if you like a little extra sweetness.
- Serve: Enjoy immediately or refrigerate for a chilled snack later!
Homemade Popcorn with Flavor Variations
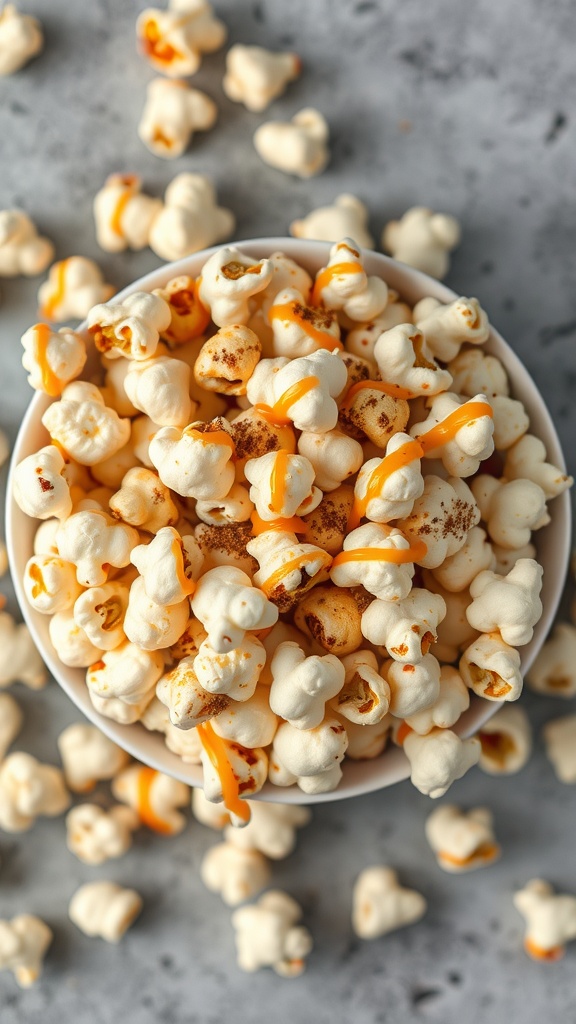
Making homemade popcorn is one of the simplest and most satisfying snacks you can whip up. This popcorn is light, airy, and perfect for satisfying cravings without breaking the bank. Plus, you can customize the flavors to match your mood, whether you prefer savory or sweet.
Popcorn is not only an affordable snack but also a fun one to prepare. You can experiment with different toppings, from classic butter and salt to adventurous spices or even sweet drizzles. There’s no right or wrong way to flavor your popcorn, making it a tasty canvas for your culinary creativity!
Ingredients
- 1/2 cup popcorn kernels
- 2 tablespoons vegetable oil or coconut oil
- Salt to taste
- 1 tablespoon melted butter (optional)
- Flavoring options: cheese powder, garlic powder, caramel sauce, or chili powder
Instructions
- Heat the oil in a large pot over medium heat. Add a few popcorn kernels to test the temperature; when they pop, the oil is ready.
- Add the rest of the popcorn kernels to the pot and cover with a lid. Shake the pot gently back and forth to keep the kernels moving.
- Once the popping slows down (about 2-3 seconds between pops), remove the pot from heat. Let it sit for a moment before opening the lid.
- If desired, drizzle melted butter over the popcorn and sprinkle with salt. Add your choice of flavoring and shake or toss to combine.
- Serve immediately and enjoy your delicious homemade popcorn!
Cheesy Garlic Breadsticks

Cheesy garlic breadsticks are a delightful snack that combines the rich flavors of melted cheese with the aromatic allure of garlic. They offer a warm, crispy texture that’s simply irresistible. This recipe is not only easy to whip up but also budget-friendly, making it perfect for any occasion.
These breadsticks are a fantastic way to treat yourself or impress guests without breaking the bank. The combination of gooey cheese and flavorful garlic makes for a snack that everyone will love. Serve them fresh out of the oven, and watch them disappear!
Ingredients
- 1 loaf of French bread
- 1/2 cup unsalted butter, softened
- 4 cloves garlic, minced
- 1 teaspoon dried oregano
- 1/2 teaspoon salt
- 2 cups shredded mozzarella cheese
- 1/4 cup grated Parmesan cheese
- Fresh parsley, chopped (optional, for garnish)
Instructions
- Preheat the oven to 375°F (190°C).
- In a small bowl, mix the softened butter, minced garlic, dried oregano, and salt until well combined.
- Slice the French bread in half lengthwise and spread the garlic butter mixture evenly over the cut sides.
- Sprinkle the mozzarella and Parmesan cheese generously on top of the buttered bread.
- Place the breadsticks on a baking sheet and bake in the preheated oven for about 15 minutes, or until the cheese is melted and bubbly.
- Remove from the oven, garnish with fresh parsley if desired, and cut into individual sticks before serving warm.
Mini Pita Pockets with Tuna Salad
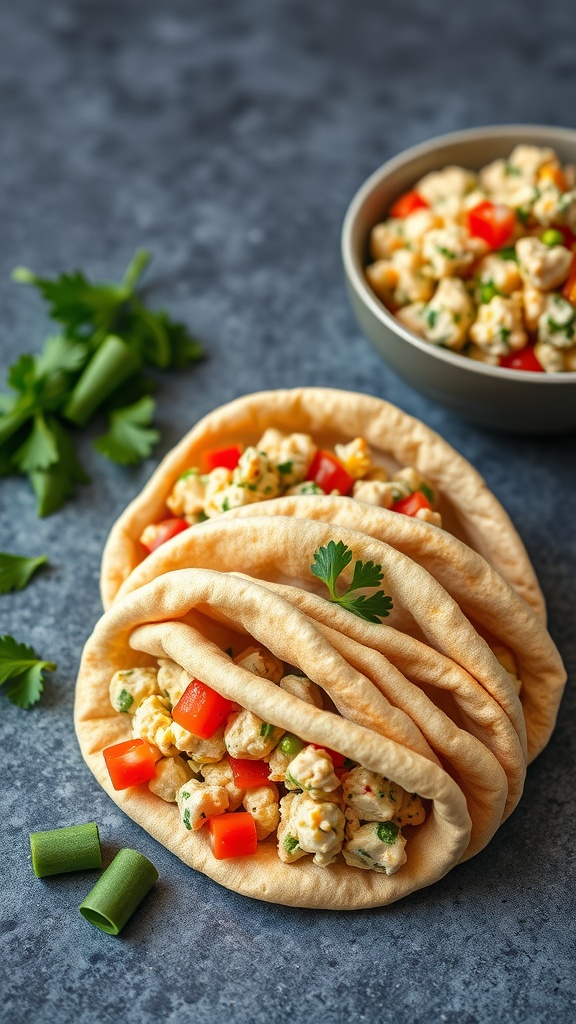
Mini pita pockets filled with tuna salad are a quick and tasty snack that’s both satisfying and budget-friendly. They offer a delightful blend of flavors and textures, making them a hit for both kids and adults. Plus, they are super easy to whip up, perfect for a busy day or a light lunch.
This recipe takes simple ingredients and turns them into a yummy treat. The tender pita bread holds a creamy tuna salad bursting with fresh veggies, giving you that crunch in every bite. You can customize the filling to your liking, making it versatile for any palate. Enjoy these crispy, flavorful bites!
Ingredients
- 2 cans tuna, drained
- 1/4 cup mayonnaise
- 1 tablespoon lemon juice
- 1/4 cup diced celery
- 1/4 cup diced red bell pepper
- 2 tablespoons chopped green onions
- Salt and pepper to taste
- Mini pita breads
Instructions
- In a mixing bowl, combine drained tuna, mayonnaise, lemon juice, celery, red bell pepper, and green onions. Mix well until all ingredients are well incorporated.
- Season with salt and pepper according to your taste.
- Cut the mini pita breads in half to create pockets.
- Stuff each pocket with the tuna salad mixture.
- Serve immediately or refrigerate for later to let the flavors meld.
Banana Oatmeal Cookies

Banana oatmeal cookies are a delightful and healthy treat everyone can enjoy. They’re chewy, flavorful, and have just the right amount of sweetness. With oats and ripe bananas as the main ingredients, these cookies not only satisfy your sweet tooth but also provide a nutritious boost.
This recipe is incredibly simple to whip up. Just mix the ingredients, bake, and you’ll have warm, fresh cookies in no time. Perfect for a quick snack or a lunchbox treat, these cookies are sure to become a favorite!
Ingredients
- 2 ripe bananas, mashed
- 1 cup rolled oats
- 1/2 cup peanut butter (or any nut butter)
- 1/4 cup honey or maple syrup
- 1/2 teaspoon vanilla extract
- 1/2 teaspoon baking powder
- 1/4 teaspoon salt
- 1/2 cup chocolate chips or nuts (optional)
Instructions
- Preheat your oven to 350°F (175°C) and line a baking sheet with parchment paper.
- In a large bowl, mix the mashed bananas, peanut butter, honey, and vanilla extract until well combined.
- Add the rolled oats, baking powder, and salt to the mixture, stirring until everything is combined. If you’re using chocolate chips or nuts, fold them in at this point.
- Drop spoonfuls of the dough onto the prepared baking sheet, spacing them about 2 inches apart.
- Bake for 10-12 minutes or until the edges are golden brown. Let them cool on the baking sheet for a few minutes before transferring them to a wire rack to cool completely.
Sweet Potato Chips with Sea Salt

Sweet potato chips are a tasty and healthy alternative to regular potato chips. They have a naturally sweet flavor and a satisfying crunch that makes them perfect for snacking. Plus, making them at home is super simple and budget-friendly!
These chips can be seasoned to your liking, but the classic touch of sea salt really brings out their natural sweetness. With just a few ingredients and a little time, you’ll have a delicious snack that’s hard to resist.
Ingredients
- 2 large sweet potatoes
- 2 tablespoons olive oil
- 1 teaspoon sea salt
Instructions
- Preheat your oven to 400°F (200°C).
- Wash and slice the sweet potatoes into thin rounds. A mandoline slicer works great for this!
- In a large bowl, toss the sweet potato slices with olive oil and sea salt until evenly coated.
- Spread the slices in a single layer on a baking sheet lined with parchment paper.
- Bake for 15-20 minutes, flipping halfway through, until they’re crispy and golden brown.
- Let them cool slightly before serving. Enjoy your homemade sweet potato chips!
Hard-Boiled Eggs with Spices
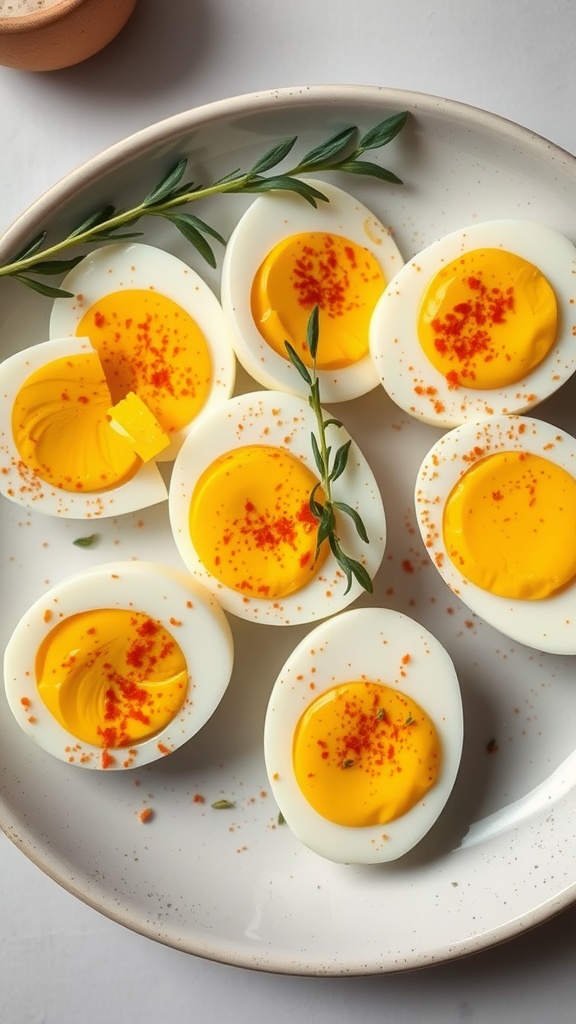
Hard-boiled eggs are a simple and satisfying snack that packs a protein punch. With just a few ingredients, you can elevate the classic boiled egg into a delicious treat. The combination of spices adds a burst of flavor, making these eggs a delightful option for any time of day.
Whether you’re looking for a quick bite between meals or a nutritious addition to your lunch, these spiced eggs are perfect. They’re easy to prepare and can be customized to suit your taste. Try experimenting with different seasonings to find your favorite blend!
Ingredients
- 6 large eggs
- 1 teaspoon paprika
- 1/2 teaspoon garlic powder
- 1/2 teaspoon onion powder
- Salt and pepper to taste
- Fresh herbs for garnish (optional)
Instructions
- Boil the Eggs: Place the eggs in a saucepan and cover them with cold water. Bring to a boil over medium heat. Once boiling, cover the pan, remove from heat, and let sit for 12-15 minutes.
- Cool and Peel: After the eggs have cooked, transfer them to an ice bath or run under cold water until cooled. Peel the eggs under running water for easier removal of the shells.
- Season: Slice the eggs in half and sprinkle with paprika, garlic powder, onion powder, salt, and pepper. Garnish with fresh herbs if desired.
- Serve: Enjoy the spiced hard-boiled eggs immediately, or store them in the fridge for a quick snack later!
Peanut Butter and Apple Slices
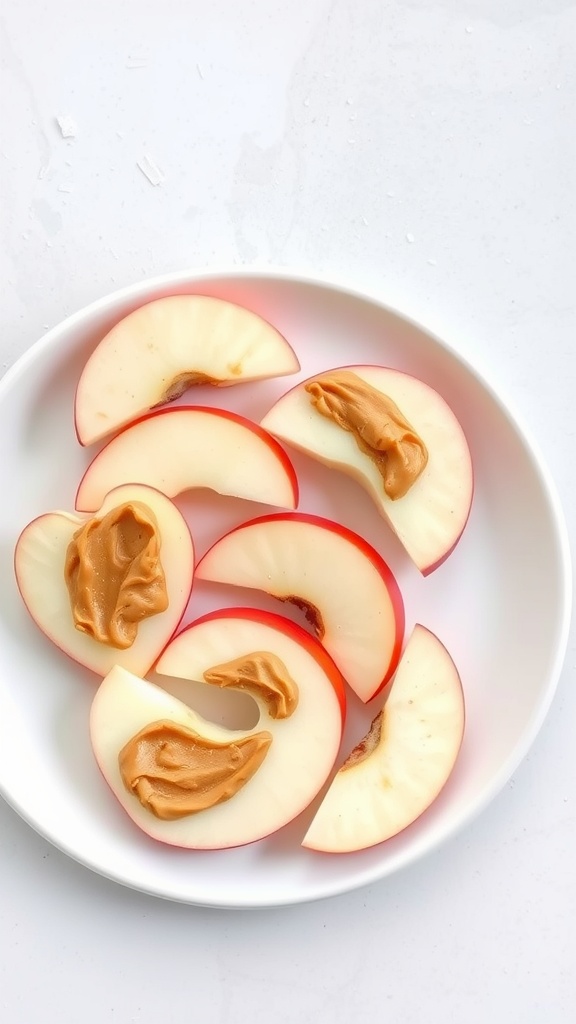
Peanut butter and apple slices make a delightful snack that’s both tasty and simple to prepare. The crispness of the apple paired with the creamy richness of peanut butter creates a satisfying bite that’s perfect for any time of the day. This snack is not only delicious but also packed with nutrients, making it a great choice for kids and adults alike.
It only takes a few minutes to whip this up, so it’s perfect for busy days. Whether you’re looking for a quick afternoon pick-me-up or a healthy treat to satisfy your cravings, this combination hits the spot. Plus, you can easily customize it by adding toppings like cinnamon or granola!
Ingredients
- 1 medium apple (any variety)
- 2 tablespoons peanut butter
- Cinnamon (optional)
- Granola (optional)
Instructions
- Wash and slice the apple into wedges or rounds, discarding the core.
- Spread a thin layer of peanut butter on each apple slice.
- If desired, sprinkle a pinch of cinnamon or add granola on top for extra flavor and crunch.
- Serve immediately and enjoy your healthy snack!
Vegetarian Quesadillas with Cheese and Veggies

Vegetarian quesadillas are a tasty and satisfying snack that packs a punch of flavor while being easy to whip up. The combination of melted cheese and fresh vegetables creates a delightful balance that’s both comforting and nutritious. Whether you’re looking for a quick bite or something to share with friends, these quesadillas are sure to please everyone.
Making them is a breeze! All you need are some tortillas, cheese, and your favorite vegetables. You can get creative with ingredients, making it a fun cooking experience. Plus, they are budget-friendly, making them perfect for any occasion.
Ingredients
- 4 flour tortillas
- 1 cup shredded cheese (cheddar or mozzarella)
- 1 cup mixed vegetables (bell peppers, onions, spinach, or zucchini)
- 1 tablespoon olive oil
- Salt and pepper, to taste
- Sour cream or salsa for serving (optional)
Instructions
- Heat the olive oil in a skillet over medium heat. Add the mixed vegetables and sauté until tender, about 5-7 minutes. Season with salt and pepper.
- Place a tortilla in the skillet. Sprinkle half of the cheese on one half of the tortilla, then add a portion of the sautéed vegetables over the cheese. Fold the tortilla in half.
- Cook for 2-3 minutes until the bottom is golden brown and the cheese begins to melt. Flip and cook for another 2-3 minutes on the other side.
- Remove from the skillet and repeat with the remaining tortillas and filling.
- Cut into wedges and serve warm with sour cream or salsa, if desired.
Cucumber Slices with Feta and Olive Oil
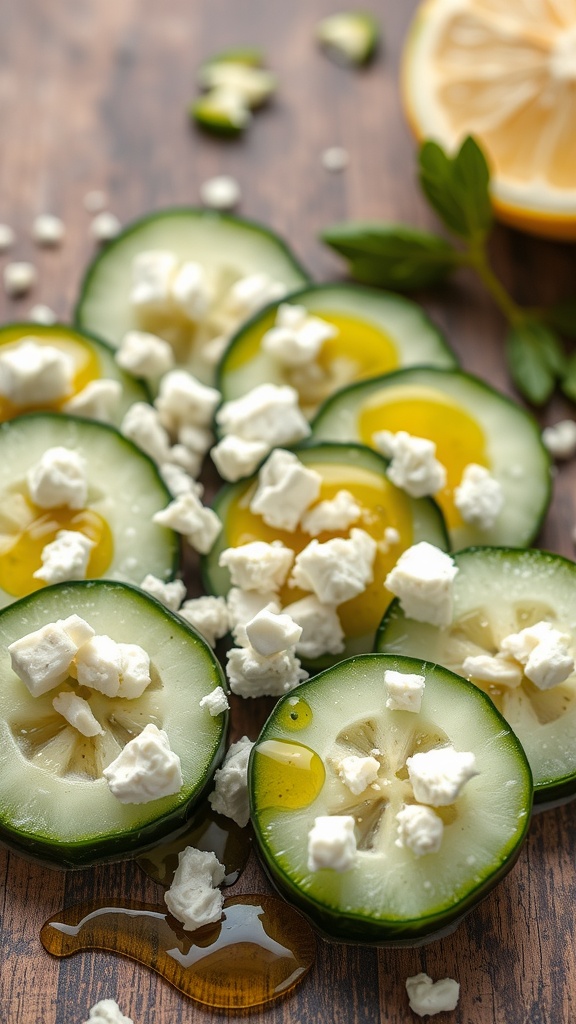
This snack is a refreshing and tasty option that’s super easy to whip up. The crispness of fresh cucumbers pairs beautifully with the creamy feta and a drizzle of olive oil, creating a light and satisfying treat. It’s perfect for a quick bite or a party appetizer!
Not only is this snack budget-friendly, but it also brings vibrant flavors to your palate. You can enjoy it as-is, or add a sprinkle of herbs for extra flavor. Give it a try; you’ll love how simple yet delicious it is!
Ingredients
- 1 large cucumber
- 1/2 cup feta cheese, crumbled
- 2 tablespoons extra-virgin olive oil
- Salt and pepper, to taste
- Fresh herbs (like dill or parsley), for garnish
Instructions
- Slice the cucumber into thin rounds and arrange them on a serving plate.
- Sprinkle the crumbled feta cheese evenly over the cucumber slices.
- Drizzle olive oil over the top and season with salt and pepper to taste.
- Garnish with fresh herbs if desired.
- Serve immediately and enjoy your refreshing snack!
Popcorn Cake with Chocolate Drizzle

If you’re looking for a fun and tasty treat, popcorn cake with chocolate drizzle is a perfect choice! This snack combines the crunch of popcorn with a rich chocolate topping, making it a delightful dessert or party snack. It’s easy to whip up, and you can customize it with your favorite toppings like sprinkles or nuts.
This cake is not just about taste; it also offers a playful presentation that will impress your guests. Perfect for gatherings or a movie night at home, it’s a budget-friendly option that everyone will love!
Ingredients
- 10 cups popped popcorn
- 1 cup mini marshmallows
- 1/2 cup unsalted butter
- 1 cup chocolate chips
- 1/4 cup sprinkles (optional)
- 1/2 cup caramel sauce (optional)
Instructions
- Prepare the Popcorn: Pop the popcorn and place it in a large bowl. Remove any unpopped kernels.
- Melt the Butter: In a saucepan over low heat, melt the butter. Add in mini marshmallows and stir until completely melted and smooth.
- Combine: Pour the melted mixture over the popcorn, and gently mix until all the popcorn is coated.
- Shape the Cake: Press the popcorn mixture into a greased cake pan, forming a cake shape. Let it cool for about 30 minutes.
- Drizzle the Chocolate: Melt the chocolate chips in a microwave or double boiler. Drizzle the melted chocolate over the cooled popcorn cake.
- Add Toppings: Sprinkle on optional sprinkles or caramel sauce while the chocolate is still warm. Let it set for about 15 minutes before serving.
Bruschetta with Tomato and Basil
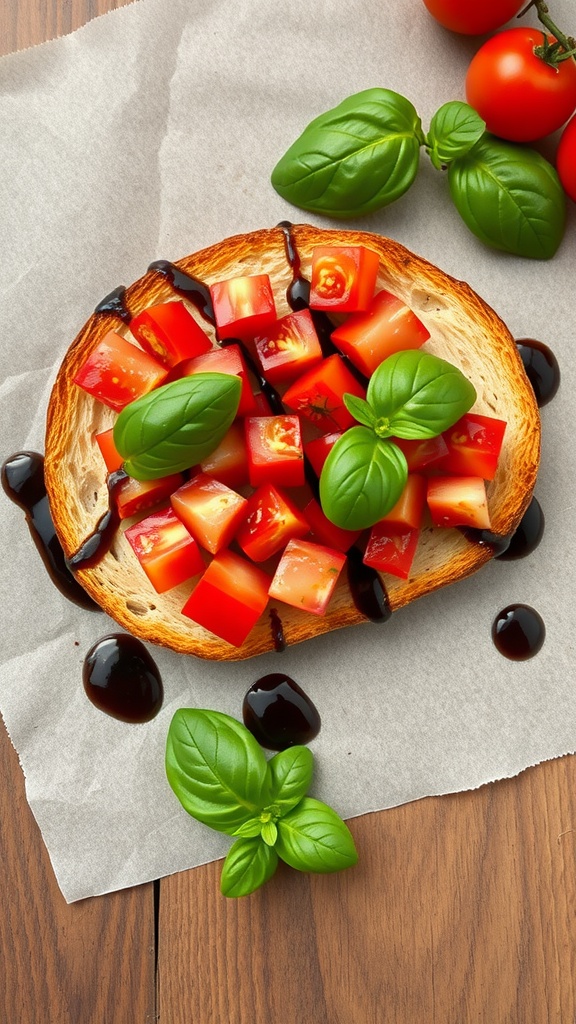
Bruschetta with tomato and basil is a delightful snack that combines fresh flavors and a satisfying crunch. This simple recipe highlights the sweetness of ripe tomatoes, the aromatic touch of fresh basil, and the crispiness of toasted bread, creating a perfect bite-sized treat.
It’s quick to make, needing only a few ingredients, making it ideal for casual gatherings or a snack at home. Serve it as an appetizer or enjoy it as a light meal—either way, it’s sure to impress!
Ingredients
- 1 baguette or crusty bread
- 2 cups ripe tomatoes, diced
- 1/4 cup fresh basil, chopped
- 2 cloves garlic, minced
- 2 tablespoons olive oil
- Salt and pepper to taste
- Balsamic glaze (optional)
Instructions
- Preheat the oven to 400°F (200°C). Slice the baguette into 1/2-inch thick pieces and arrange them on a baking sheet.
- Brush each slice with olive oil and toast in the oven for about 5-7 minutes until golden and crispy.
- In a mixing bowl, combine the diced tomatoes, chopped basil, minced garlic, olive oil, salt, and pepper. Stir gently to mix.
- Once the bread is toasted, remove it from the oven and top each piece with the tomato mixture.
- Drizzle with balsamic glaze if desired and serve immediately for the best flavor and crunch.
Frozen Yogurt Bark with Fruits and Nuts
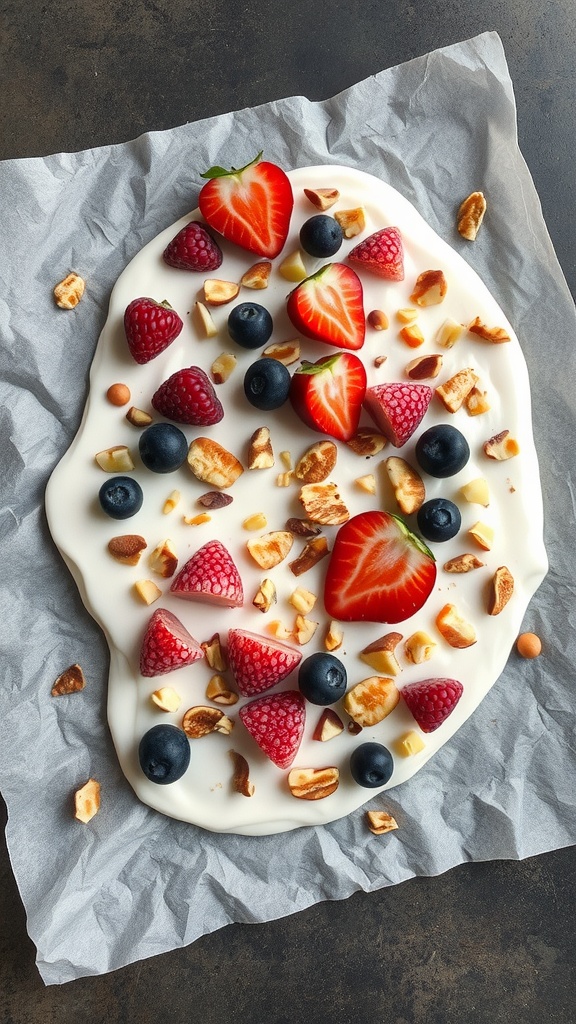
Frozen yogurt bark is a fun and delicious treat that’s perfect for satisfying sweet cravings without the guilt. The creamy yogurt base pairs beautifully with fresh fruits and crunchy nuts, creating a delightful combination of textures and flavors. It’s a simple recipe that requires minimal effort, making it a great option for a quick snack or dessert.
The tartness of yogurt, combined with the natural sweetness of fruits and the nuttiness of almonds or walnuts, makes this snack not only tasty but also nutritious. Plus, it’s customizable! You can mix and match your favorite fruits and nuts. This frozen treat is sure to impress anyone who tries it and is a fantastic way to beat the heat.
Ingredients
- 2 cups plain Greek yogurt
- 2 tablespoons honey or maple syrup
- 1 cup mixed berries (strawberries, blueberries, raspberries)
- 1/2 cup chopped nuts (almonds, walnuts, or pecans)
- 1/4 cup mini chocolate chips (optional)
Instructions
- Prepare the Yogurt Mixture: In a mixing bowl, combine the Greek yogurt and honey (or maple syrup). Stir until well blended.
- Spread the Mixture: Line a baking sheet with parchment paper. Pour the yogurt mixture onto the sheet and spread it out evenly to about 1/4 inch thick.
- Add Toppings: Scatter the mixed berries and chopped nuts over the yogurt. If you like, you can also sprinkle mini chocolate chips on top.
- Freeze: Place the baking sheet in the freezer for at least 4 hours or until the yogurt is completely frozen.
- Break into Pieces: Once frozen, remove the yogurt bark from the freezer. Use a sharp knife or your hands to break it into pieces. Serve immediately or store in an airtight container in the freezer for up to a month.
Avocado Toast with Tomato and Chilli Flakes
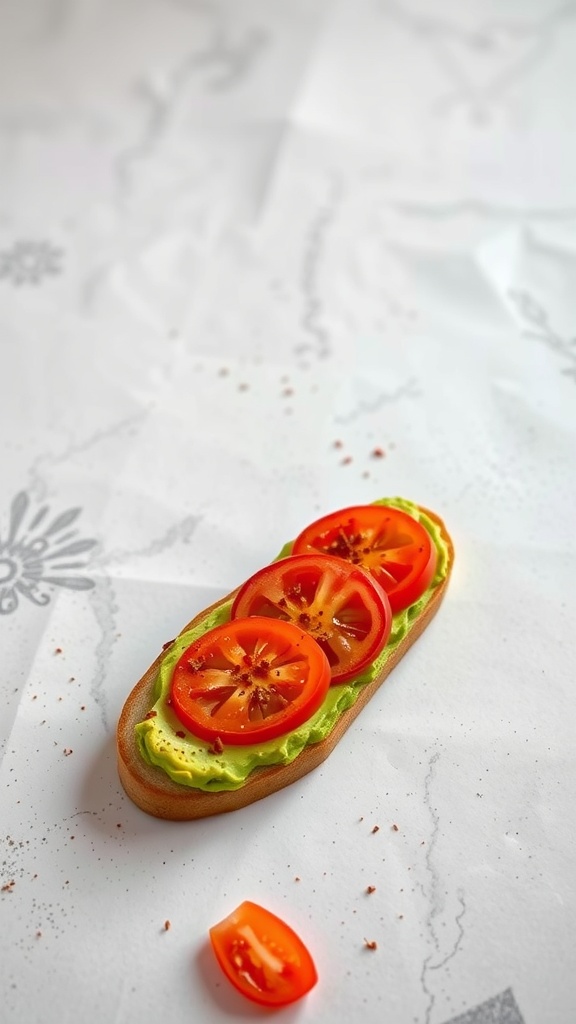
Avocado toast is a simple yet delicious snack that packs a punch in flavor and nutrition. The creaminess of ripe avocado complements the juicy freshness of tomatoes, while a sprinkle of chili flakes adds a delightful heat. It’s a quick and satisfying option whether you’re looking for a light bite or a more filling treat.
This snack is not only easy to whip up, but it also allows for creativity in toppings. Feel free to customize with your favorite herbs or additional spices. Plus, it’s budget-friendly!
Cheese and Crackers Platter
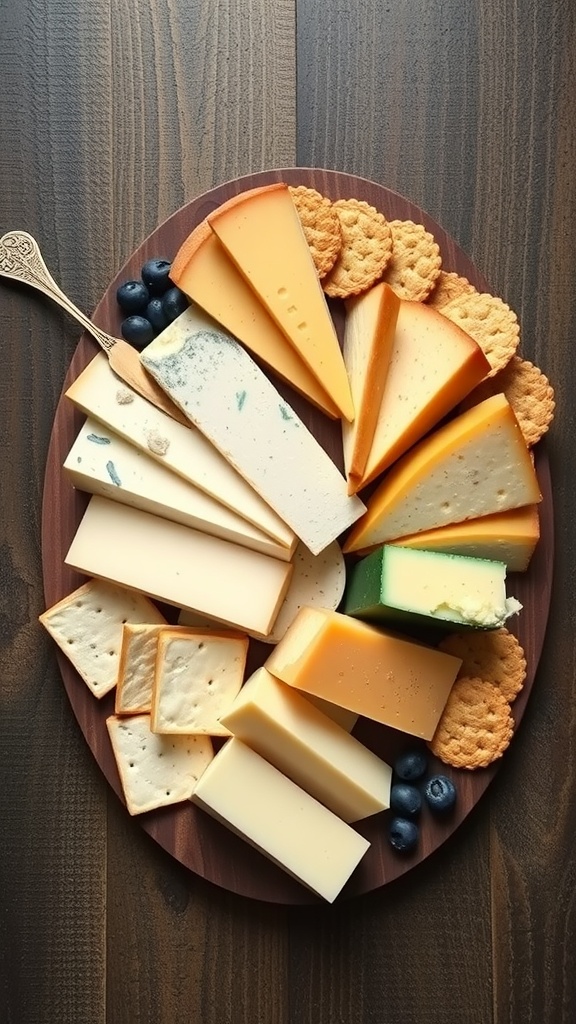
A cheese and crackers platter is a delightful and simple snack option that brings together a variety of flavors and textures. It’s perfect for casual gatherings, family movie nights, or even just a quick afternoon bite. The creamy, sharp, and tangy cheeses pair beautifully with the crunch of crackers, making every bite a little celebration for your taste buds.
This recipe is incredibly easy to assemble. Just select your favorite cheeses and crackers, arrange them artfully on a platter, and you’re all set. Add some fruits or nuts to elevate the experience!
Ingredients
- 5 different types of cheese (cheddar, brie, gouda, blue cheese, and pepper jack)
- 2-3 varieties of crackers (water crackers, whole grain, and cheese-flavored)
- Fresh fruits (grapes, blueberries, or apple slices)
- Mixed nuts (optional)
Instructions
- Choose your cheeses: Select a mix of soft, hard, and blue cheeses for a variety of textures and flavors.
- Prepare the platter: Use a large wooden board or a pretty serving platter. Start by placing the cheeses in different sections of the board.
- Add crackers: Fill in the spaces around the cheese with your chosen crackers, varying the shapes and sizes for visual appeal.
- Incorporate fruits: Scatter fresh fruits like grapes or berries around the cheeses and crackers for a pop of color and sweetness.
- Optional: If using, add small bowls of mixed nuts for an extra crunch.
- Serve and enjoy: Offer cheese knives for easy serving and watch everyone dig in!
Savory Oatmeal with Spinach and Feta
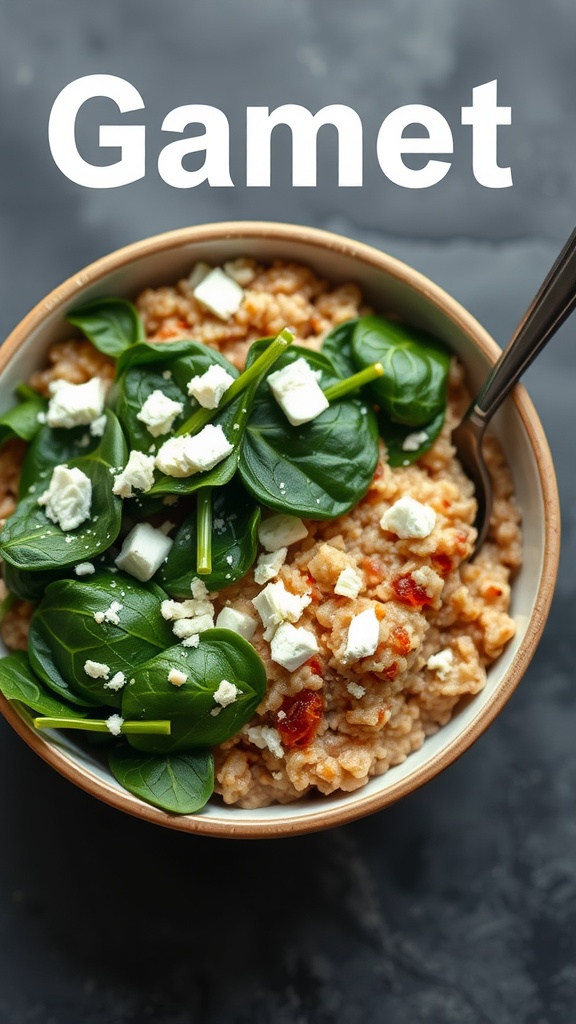
This savory oatmeal with spinach and feta is a delightful twist on traditional oatmeal. It’s creamy, satisfying, and has a wonderful balance of flavors, making it a perfect snack or light meal. You’ll love the fresh taste of spinach combined with the tangy feta cheese, creating a dish that’s both nutritious and delicious.
Not only is it simple to prepare, but it’s also budget-friendly. In just a few minutes, you can whip up a comforting bowl that’s packed with protein and vitamins. This recipe is great for those busy days when you want something quick yet fulfilling!
Ingredients
- 1 cup rolled oats
- 2 cups vegetable broth or water
- 1 cup fresh spinach, roughly chopped
- 1/2 cup feta cheese, crumbled
- 1/4 cup sun-dried tomatoes, chopped
- 1 tablespoon olive oil
- Salt and pepper to taste
Instructions
- Cook the Oats: In a medium saucepan, bring the broth or water to a boil. Stir in the oats and reduce the heat to a simmer. Cook for about 5 minutes, or until the oats are tender and creamy.
- Add Spinach and Tomatoes: Stir in the chopped spinach and sun-dried tomatoes. Cook for an additional 1-2 minutes until the spinach is wilted.
- Finish with Feta: Remove from heat and stir in the olive oil. Season with salt and pepper. Top with crumbled feta cheese before serving.
Fruit Skewers with Yogurt Dip

Fruit skewers are a fun and colorful snack that’s perfect for any occasion. They’re bursting with fresh flavors and can easily be customized to suit your taste. The sweet and juicy fruits paired with a creamy yogurt dip make for a delightful treat that everyone will enjoy.
This recipe is not only simple to make, but it’s also a great way to sneak in some healthy options. Just chop up your favorite fruits, assemble them on skewers, and whip up a quick yogurt dip. It’s a delicious snack that’s sure to please both kids and adults!
Ingredients
- 1 cup strawberries, hulled and halved
- 1 cup pineapple, cut into chunks
- 1 cup mango, cut into cubes
- 1 cup blueberries
- 1 cup green grapes
- 1 cup yogurt (any flavor)
- 1 tablespoon honey (optional)
Instructions
- Prepare the Fruits: Wash and cut the strawberries, pineapple, mango, and grapes as needed.
- Assemble the Skewers: Alternate threading the prepared fruits onto skewers. You can mix and match based on your preference.
- Make the Yogurt Dip: In a bowl, combine yogurt and honey, mixing well until smooth.
- Serve: Arrange the fruit skewers on a plate with the yogurt dip on the side for dipping.
Egg Muffins with Veggies and Cheese

Egg muffins with veggies and cheese are a tasty, budget-friendly snack that packs a protein punch. They’re simple to whip up and offer endless customization options, making them a fun addition to your snack rotation.
The combination of fluffy eggs, colorful vegetables, and melty cheese creates a delightful taste experience. Perfect for meal prep, these muffins can be made ahead of time and stored in the fridge, ready for a quick breakfast or snack anytime.
Ingredients
- 8 large eggs
- 1 cup diced bell peppers
- 1 cup chopped spinach
- 1 cup shredded cheese (cheddar or mozzarella)
- 1/2 cup diced tomatoes
- 1/4 teaspoon salt
- 1/4 teaspoon black pepper
- 1/4 teaspoon garlic powder
Instructions
- Preheat the oven to 350°F (175°C) and grease a muffin tin.
- In a large bowl, whisk the eggs. Add salt, pepper, and garlic powder, mixing until well combined.
- Stir in the bell peppers, spinach, tomatoes, and half of the cheese.
- Pour the egg mixture evenly into the muffin tin, filling each cup about 3/4 full.
- Top each muffin with the remaining cheese.
- Bake for 18-20 minutes or until the eggs are set and the tops are golden.
- Let them cool slightly before removing from the tin, and enjoy!
Chickpea Salad with Lemon and Herbs
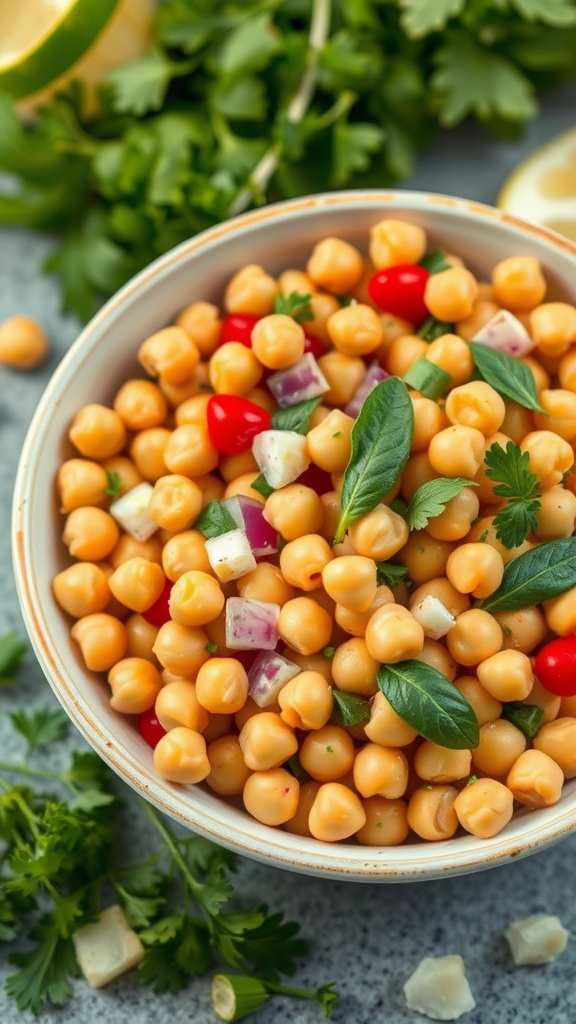
This chickpea salad is a refreshing, budget-friendly snack that’s packed with flavor. It balances the nutty taste of chickpeas with the zesty notes of lemon and a medley of fresh herbs, making it a perfect choice for a light meal or a quick snack.
Not only is it simple to prepare, but it’s also nutritious and satisfying. You can easily whip it up in under 15 minutes, making it a go-to for busy days or unexpected guests. Enjoy it on its own, or pair it with pita bread for a delightful treat!
Ingredients
- 1 can (15 ounces) chickpeas, drained and rinsed
- 1 cup cherry tomatoes, halved
- 1/2 red onion, diced
- 1/4 cup feta cheese, crumbled (optional)
- 1/4 cup fresh parsley, chopped
- 1/4 cup fresh basil, chopped
- Juice of 1 lemon
- 2 tablespoons olive oil
- Salt and pepper to taste
Instructions
- In a large bowl, combine the chickpeas, cherry tomatoes, red onion, feta cheese, parsley, and basil.
- Drizzle with olive oil and lemon juice, then season with salt and pepper.
- Toss everything together until well mixed.
- Let the salad sit for about 5 minutes to allow the flavors to meld.
- Serve chilled or at room temperature.
Cottage Cheese with Pineapple
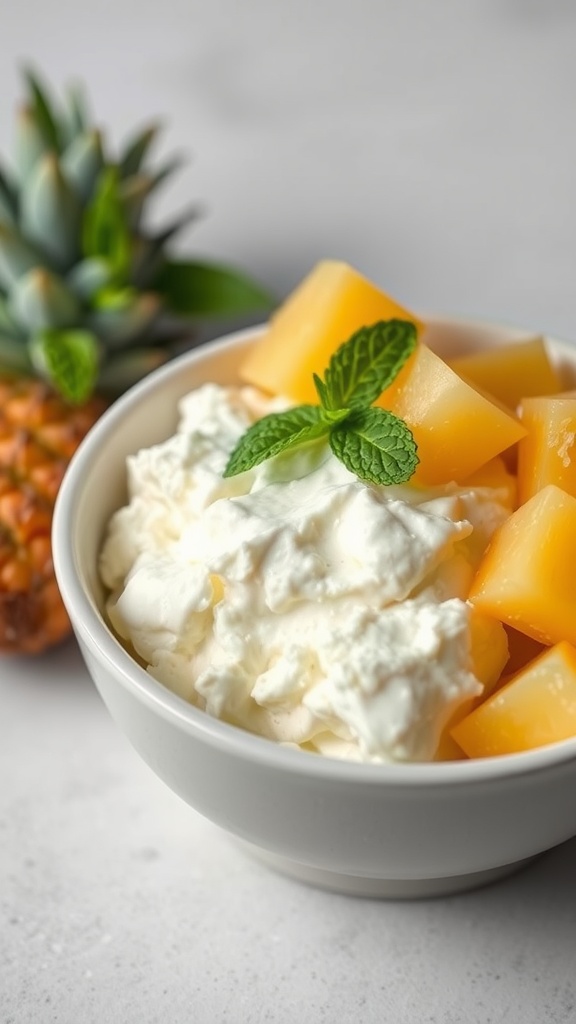
This Cottage Cheese with Pineapple snack is a delightful mix of creamy and fruity goodness. Perfect for a quick bite, it offers a refreshing taste that’s both sweet and tangy. The creaminess of the cottage cheese pairs perfectly with the juicy pineapple, making it a satisfying treat.
Not only is it easy to whip up, but it’s also a nutritious option that keeps you feeling full. Whether you need a mid-afternoon snack or a light dessert, this dish fits the bill without breaking the bank.
Ingredients
- 1 cup cottage cheese
- 1/2 cup pineapple chunks (fresh or canned)
- 1 tablespoon honey (optional)
- Fresh mint leaves for garnish (optional)
Instructions
- In a bowl, combine the cottage cheese and pineapple chunks.
- If desired, drizzle honey over the mixture for added sweetness.
- Stir gently to mix everything together.
- Garnish with fresh mint leaves if using.
- Serve immediately and enjoy your healthy snack!
Baked Zucchini Fries with Marinara Sauce
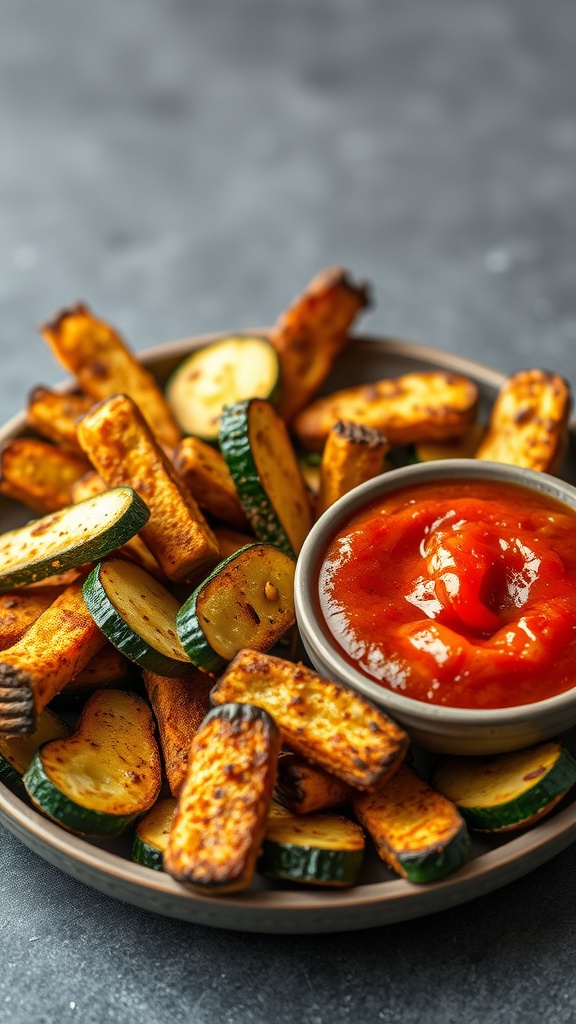
Baked zucchini fries are a fantastic way to enjoy a crispy snack without the guilt. They are simple to make, bursting with flavor, and deliciously paired with marinara sauce for dipping. The zucchini becomes tender and slightly sweet when baked, while the coating adds a satisfying crunch.
This recipe is perfect for a quick snack or as a side dish. Plus, it’s budget-friendly and a great way to sneak in some veggies. Gather your ingredients and get ready to whip up these tasty baked zucchini fries!
Ingredients
- 2 medium zucchinis
- 1 cup breadcrumbs
- 1/2 cup grated parmesan cheese
- 1 teaspoon garlic powder
- 1 teaspoon paprika
- 1/2 teaspoon salt
- 1/4 teaspoon black pepper
- 2 large eggs
- 1 cup marinara sauce (for dipping)
Instructions
- Preheat the oven to 425°F (220°C) and line a baking sheet with parchment paper.
- Slice the zucchinis into thin strips, resembling fries.
- In a bowl, mix breadcrumbs, parmesan cheese, garlic powder, paprika, salt, and pepper.
- In another bowl, beat the eggs. Dip each zucchini strip into the egg, then coat with the breadcrumb mixture.
- Place the coated zucchini fries on the prepared baking sheet in a single layer.
- Bake for 20-25 minutes, flipping halfway through, until crispy and golden brown.
- Serve warm with marinara sauce on the side for dipping.
Cream Cheese and Chives on Cucumber
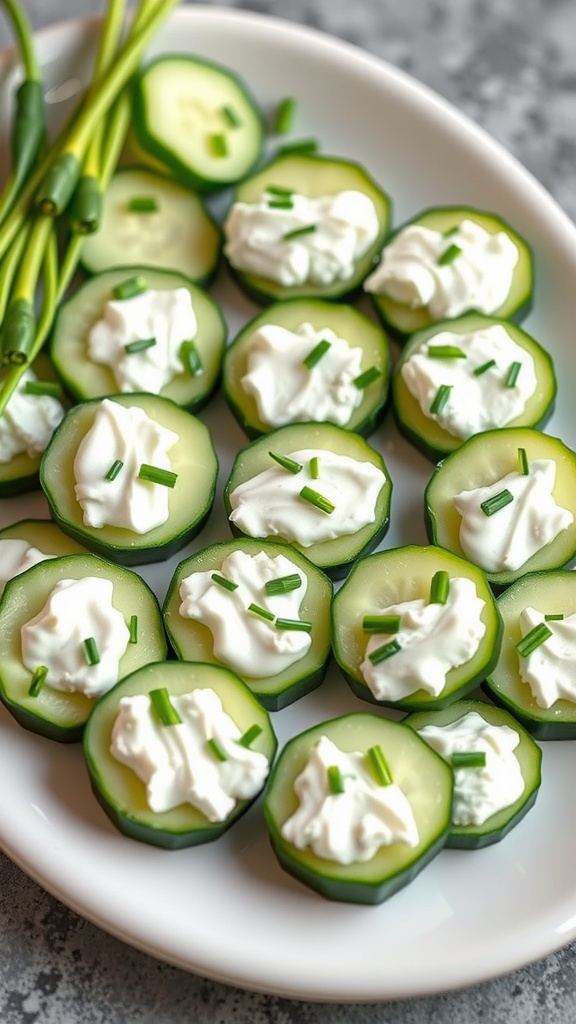
This simple and refreshing snack is perfect for any occasion. The crunchy cucumbers offer a satisfying bite, while the creamy cheese adds a rich flavor, enhanced by the fresh chives. It’s not only easy to prepare but also visually appealing, making it an ideal addition to any gathering or a quick treat at home.
With just a few ingredients, you can whip up this delightful snack in no time. It’s light, healthy, and will surely impress your friends and family. Plus, it’s budget-friendly, leaving more room in your wallet for other treats!
Ingredients
- 1 large cucumber
- 8 oz cream cheese, softened
- 2 tablespoons fresh chives, chopped
- Salt and pepper to taste
Instructions
- Wash the cucumber and slice it into thin rounds.
- In a bowl, mix the softened cream cheese with chopped chives, salt, and pepper until well combined.
- Spoon a small amount of the cream cheese mixture onto each cucumber slice.
- Garnish with additional chives if desired, and serve chilled.
Chocolate-Dipped Strawberries

Chocolate-dipped strawberries are an easy and delicious treat that combines the sweet, juicy flavor of fresh strawberries with rich, smooth chocolate. They make for a perfect snack or dessert for any occasion, from casual get-togethers to special celebrations.
This recipe is simple and quick, requiring just a few ingredients. The satisfaction of biting into a chocolate-covered strawberry is unmatched, with the balance of sweetness and a hint of tartness delivering a delightful experience with every bite.
Ingredients
- 1 pound fresh strawberries
- 8 ounces dark chocolate (or milk chocolate, depending on your preference)
- 1 tablespoon coconut oil (optional, for a smoother chocolate coating)
Instructions
- Prepare the Strawberries: Rinse the strawberries under cool water and gently pat them dry with a paper towel. Make sure they are completely dry, as any moisture can prevent the chocolate from sticking.
- Melt the Chocolate: In a microwave-safe bowl, combine the dark chocolate and coconut oil (if using). Microwave in 30-second intervals, stirring in between until smooth and fully melted.
- Dip the Strawberries: Hold each strawberry by the stem and dip it into the melted chocolate, ensuring the strawberry is coated at least halfway. Let any excess chocolate drip off.
- Cool the Strawberries: Place the dipped strawberries on a baking sheet lined with parchment paper. Once all are coated, refrigerate them for about 30 minutes to set the chocolate.
- Serve: Enjoy the chocolate-dipped strawberries fresh for the best taste!
Oven-Baked Potato Wedges with Dipping Sauce
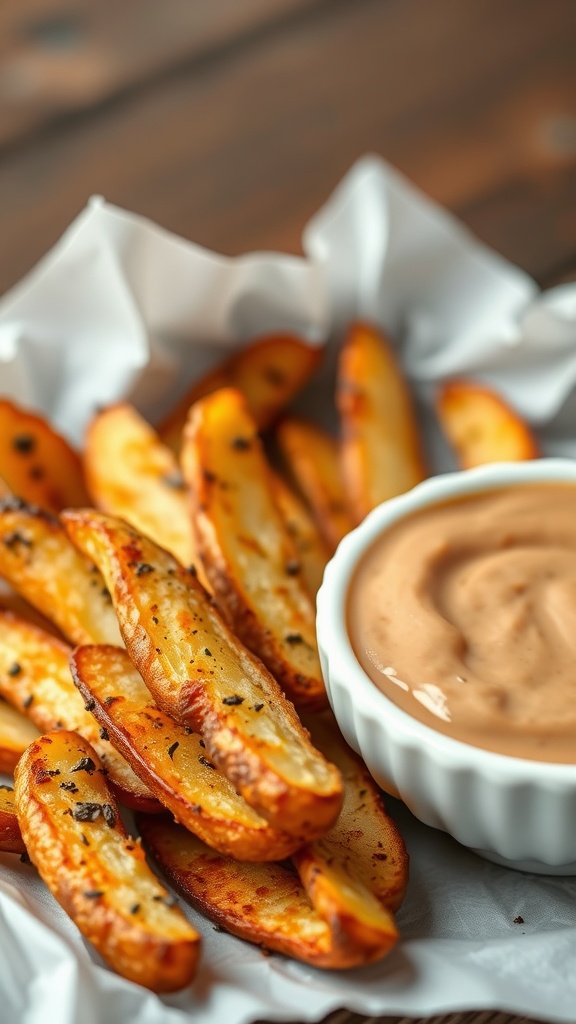
Oven-baked potato wedges are a tasty and budget-friendly snack that everyone loves. They are crispy on the outside and soft on the inside, making them a perfect treat for any time of the day. This recipe is super simple, requiring just a few ingredients and minimal prep time.
Pair these wedges with your favorite dipping sauce, and you’ve got a snack that’s not only delicious but also satisfying. They are great for gatherings, movie nights, or just a quick bite during the day!
Ingredients
- 4 medium potatoes
- 3 tablespoons olive oil
- 1 teaspoon garlic powder
- 1 teaspoon paprika
- 1/2 teaspoon salt
- 1/4 teaspoon black pepper
- Your choice of dipping sauce (ranch, ketchup, or honey mustard)
Instructions
- Preheat your oven to 425°F (220°C) and line a baking sheet with parchment paper.
- Wash and cut the potatoes into wedges. You can leave the skin on for extra flavor and nutrition.
- In a large bowl, toss the potato wedges with olive oil, garlic powder, paprika, salt, and pepper until they are evenly coated.
- Spread the wedges out in a single layer on the prepared baking sheet, ensuring they are not overcrowded.
- Bake for 25-30 minutes, turning halfway through, until the wedges are golden brown and crispy.
- Serve hot with your favorite dipping sauce!
Stuffed Mini Peppers with Cream Cheese

Stuffed mini peppers with cream cheese are a delightful and colorful snack that’s both easy to prepare and fun to eat. These bite-sized treats offer a perfect blend of crunchy sweetness from the peppers and rich creaminess from the cheese, making them a hit at any gathering.
This recipe is simple and quick, making it ideal for a last-minute party or just a cozy night in. Whether served as an appetizer or a snack, they are sure to please everyone!
Ingredients
- 12 mini sweet peppers (red, orange, yellow, or green)
- 8 ounces cream cheese, softened
- 1 cup shredded cheddar cheese
- 1 tablespoon garlic powder
- 1 tablespoon onion powder
- Salt and pepper to taste
Instructions
- Preheat your oven to 375°F (190°C).
- Cut the mini peppers in half lengthwise and remove the seeds.
- In a bowl, mix the softened cream cheese, shredded cheddar cheese, garlic powder, onion powder, salt, and pepper until well combined.
- Stuff each pepper half with the cream cheese mixture, ensuring they are filled generously.
- Place the stuffed peppers on a baking sheet and bake for about 15-20 minutes or until the peppers are tender and the cheese is slightly golden.
- Let cool for a few minutes before serving. Enjoy your delicious stuffed mini peppers!
Spiced Apple Chips

Spiced apple chips are a delicious and healthy snack that brings together the sweetness of apples and a hint of warmth from spices. They’re crispy, crunchy, and perfect for munching on throughout the day. Making them is a breeze—just slice, season, and bake!
The flavor combination of cinnamon and nutmeg enhances the natural sweetness of the apples, making them a satisfying treat. Plus, they’re budget-friendly and a great way to use up extra apples. Enjoy them on their own or as a topping for yogurt or salads.
Ingredients
- 4 medium apples (your choice of variety)
- 1 teaspoon ground cinnamon
- 1/2 teaspoon ground nutmeg
- 1 tablespoon lemon juice
- 1 tablespoon sugar (optional)
Instructions
- Preheat your oven to 200°F (95°C) and line a baking sheet with parchment paper.
- Core the apples and slice them thinly, about 1/8 inch thick. A mandoline slicer works well for this.
- In a bowl, toss the apple slices with lemon juice, cinnamon, nutmeg, and sugar until evenly coated.
- Arrange the apple slices in a single layer on the prepared baking sheet, ensuring they don’t overlap.
- Bake in the preheated oven for 2-3 hours, flipping halfway through, until the apples are dry and crispy.
- Let them cool completely before storing in an airtight container.
Coconut Macaroons with Dark Chocolate Drizzle

Coconut macaroons are a delightful treat that combines sweet, chewy coconut with a rich chocolate finish. These snacks are incredibly easy to make, requiring just a handful of ingredients and minimal prep time. Perfect for satisfying your sweet tooth on a budget, they offer a wonderful contrast of textures and flavors, with the crunchy exterior giving way to a moist and tender center.
The addition of a dark chocolate drizzle elevates these macaroons, making them not just a snack but a little piece of indulgence. Whether you’re hosting a get-together or just looking for something sweet to enjoy at home, these coconut macaroons are sure to impress everyone!
Ingredients
- 2 1/2 cups sweetened shredded coconut
- 2/3 cup sweetened condensed milk
- 1 teaspoon vanilla extract
- 2 large egg whites
- 1/4 teaspoon salt
- 1/2 cup dark chocolate chips
Instructions
- Preheat the oven to 325°F (160°C) and line a baking sheet with parchment paper.
- In a large bowl, combine shredded coconut, sweetened condensed milk, and vanilla extract. Mix until well combined.
- In another bowl, beat the egg whites and salt until stiff peaks form. Gently fold the egg whites into the coconut mixture until just combined.
- Using a tablespoon or cookie scoop, drop mounds of the mixture onto the prepared baking sheet, spacing them about 2 inches apart.
- Bake for 20-25 minutes, or until the edges are golden brown. Remove from the oven and let cool completely on the baking sheet.
- While the macaroons cool, melt the dark chocolate chips in a microwave-safe bowl in 30-second intervals, stirring in between until smooth.
- Once the macaroons are cool, drizzle the melted chocolate over the tops using a fork or piping bag. Allow the chocolate to set before serving.
Energy Bites with Dates and Nuts
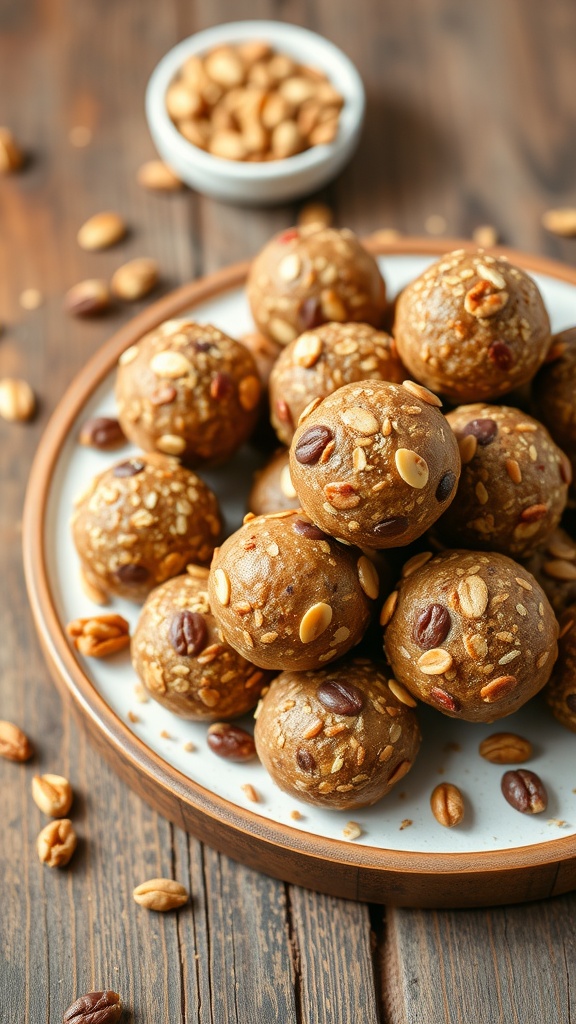
Energy bites with dates and nuts are a delicious and nutritious snack perfect for any time of the day. These little power-packed balls are sweet, chewy, and loaded with healthy fats, making them an excellent choice for a quick energy boost. Plus, they require no baking, making them super simple to whip up.
The combination of dates and nuts provides a satisfying crunch along with natural sweetness. You can customize these bites with your favorite ingredients, whether it’s adding chocolate chips or different types of nuts. They are easy to store and grab on the go, making them a fantastic budget-friendly snack.
Ingredients
- 1 cup pitted dates
- 1 cup mixed nuts (almonds, walnuts, pecans)
- 1/2 cup rolled oats
- 1 tablespoon honey or maple syrup
- 1/4 cup nut butter (peanut or almond)
- 1 tablespoon chia seeds (optional)
- 1/4 cup mini chocolate chips (optional)
Instructions
- Prepare the Dates: In a food processor, blend the pitted dates until they form a sticky paste.
- Mix Ingredients: Add the mixed nuts, rolled oats, honey, nut butter, and chia seeds to the food processor. Pulse until everything is combined but still has some texture.
- Shape the Bites: Use your hands to roll the mixture into small balls, about the size of a tablespoon.
- Chill: Place the energy bites on a baking sheet and refrigerate for at least 30 minutes to firm up.
- Store: Keep the bites in an airtight container in the fridge for up to a week or freeze for longer storage.


